The reason I decided on getting this body lift over the
other ones was the quality involved. I had a Prothane 1" lift
on my old Jeep and didn't like it at all. The body felt vague on
the frame when you cornered and on the trail. It was disconcerting
at times. I eventually removed it from my other Jeep. I was
able to see the JKS on a friends Jeep and discussed it with him.
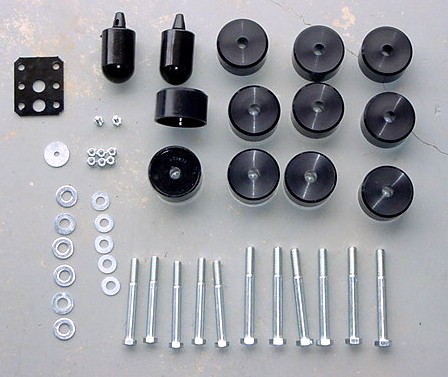
This is what sold me on JKS. 1 1/4" lift, this is more than
any of the other ones out there at the moment and would give me just a
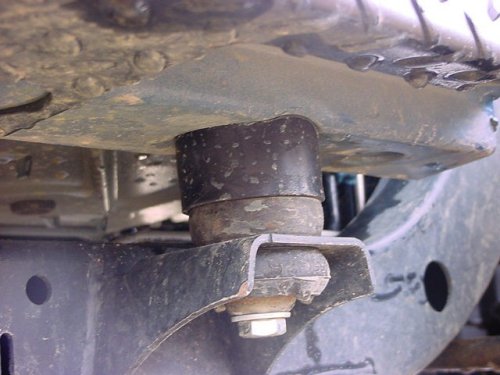
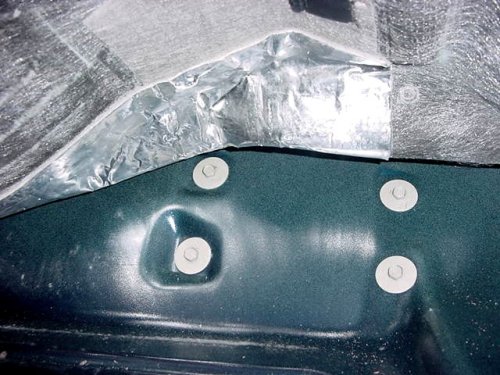
little bit more when I lifted the gas tank up. They have a beveled
edge on top to sit right in the same spot as the factory mount and not
slide around, believe me I could feel the difference. The bottom
is recessed 1/4 inch so the factory mount slides up inside for more stability.
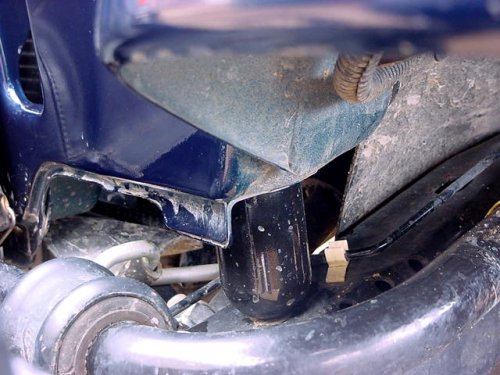
This kit also comes with extended snubbers for the front corners of your
grill. Side note these are a real pain to get in. The final
thing that sold me on them was the quality of manufacturing that went
with it.
I had already installed the M.O.R.E. Motor Mount lift so I
didn't have to worry about the fan shroud and skipped the steps for drilling new
holes to remount the shroud The main reason I lifted the body was in
preparations for a Kilby's gas tank skid, and hopefully someone's transmission
skid.
Additional
Parts:
Anti-seize
Tools
Needed:
16mm socket
10mm socket
7/16" socket
7/16" combo wrench
Floor Jack/ wood and a spacer
A couple of notes before you begin this. The Gas Tank filler hose will
be stretched even with the body back down on these mounts, so be careful as to
how high you lift the rear of the Jeep. On the other side with the 2003's
is the charcoal canister with it myriad of plastic hoses, these don't stretch,
so once again you have something to be concerned with. The transfer case
spacer may or may not be needed. I did a 1" Motor Mount Lift at the
same time so didn't really need to put it in. I have since taken it out
and only experience a slight up angle on the arm. With the bracket
installed it was angled down. You will also need to disconnect the Fog
Lights. The wiring is to short for it to remain in the stock
location. What I did was just pull the clip out of the hole under the
fender and leave it hang, I haven't hooked it on anything after many trips off
road so I'm not to worried about it. I will eventually get the extensions
for these and run the wiring to a safer location. Extension part #
W82203245.
Installation:
1. I used a floor jack to lift the body. I needed to use a cinder
block on top of the jack to get enough distance to actually lift the
body. I could have probably done this with a big chunk of wood,
but I didn't have any of that. I did put a piece of wood between
the body and the block. I positioned the jack near the rear
part of the door so that I could try to lift the body evenly.
2. I loosened all of the body mount bolts. There are 6 underneath
the doors, 1 underneath the front grill, 2 up above the rear axle
in front of the gas tank, and 2 more under the rear corners of the
Jeep.
3. I laid out all the pieces of the kit so that i could get easy access
to them. I then removed the 5 body bolts from the driver side
and the 1 bolt holding the grill in position. The grill moved
forwards on me as soon as I took this bolt out. This caused
a little concern, but I could push on the grill and it moved easy
enough so I figured I could get it back in.
4. I then lifted up the body just enough to clear the new mounts.
Be careful how far you lift it. The gas fill tube will be stretched
on the driver side and over on the passenger side you have to be careful
about the plastic lines going to the vapor recovery system.
5. Once you get all the body mounts in, slowly lower the body back
down on them and loosely install all of the bolts. You may have
some problems with the rear 2 bolts because the nuts are in a channel
and move around. A Philips screwdriver or something else small
will help you get them back in alignment.
6. Now repeat the same over on the other side. This time make
certain that you install the front grill support. This gave
me the hardest time lining back up. Another person would have
been helpful, but I was able to get it. You will not be able
to tighten back to factory specs, just tighten until the mount just
starts to bulge. I was able to get over 25ft/lbs on each mount
with ease.
Front
Snubbers: 1. Getting the snubbers out is easy, just give a pull and a
little twist and they come right out. Okay now you have to try
and jam this bigger one back in. They fit really tight and the
most important thing is to get them all the way installed. They
have a cone on top of them that has to go in all the way past the
bottom lip. I inserted the cone into the hole and put a big
screwdriver under the snubber and slowly applied pressure while rotating
the snubber back and forth. It finally went up and in.
Be careful, your fingers are what the screwdriver will hit if it slips
out from underneath.
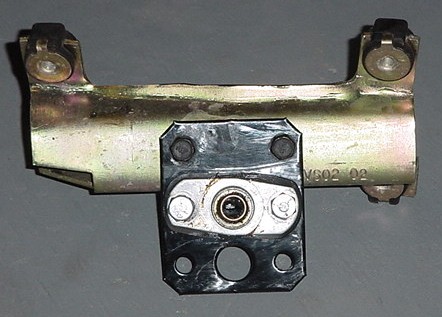
The
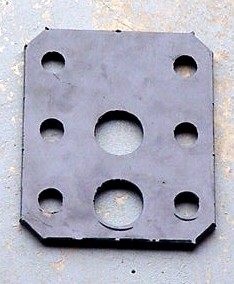
transfer case shift lever bracket: 1. It is recommended that you install the drop down spacer
that comes with the kit. The one that I got with my kit from
JKS allowed you to drop it down 1 or 2 inches and was powder coated.
This is the only part that I was not happy with the manufacturing.
The powder coating was great, but they didn't debur this part before.
It had multiple sharp points on it. None of this affected installation,
so I didn't bother to grind them off. You can make out the points
in the photo.
2. You will need to pull up the carpet on the driver side to get
the 4 screws out that hold this bracket in.
3. Now crawl underneath and pull the bracket off the lever shaft.
Just push the lever towards the center will give you enough room to
get it out. Be careful there is a spring in the rubber boot
if equipped. Now remove the bushing from the bracket, install
it in the adaptor, and bolt the adaptor on the bracket. Installation
is the reverse of removal.
ADJUSTMENTS
- SHIFT LINKAGE You may need to adjust the 4wd shifter just slightly. If you
need to do that you will notice a bolt and clamp on the shaft attached to
the shifter. Observe how the lever shifts and make a slight
adjustment based on that. I could probably adjust mine, but I will
let everything settle first. The easiest way to do this is to place
the shifter in 4wd high, loosen the bolt on the trunnion block and give it
a little jiggle. The block should reposition itself to the correct
position. Tighten it back up and give it a shot.
I did notice that it was a little harder to get the transmission into
2nd and 4th as the boot folds up, but not enough to worry about it since I
am getting good engagement. The concern here is that if you are not
engaging the gears all the way you will wear the teeth in the transmission
since all the torque is now applied to a small area.
Here is the factory way. I would suggest trying this way also if
it doesn't adjust in 4wd High.
(1) Shift transfer case into 4L position.
(2) Raise vehicle.
(3) Loosen lock bolt on adjusting trunnion.
(4) Be sure linkage rod slides freely in trunnion. Clean rod and
apply spray lube if necessary.
(5) Verify that transfer case range lever is fully engaged in 4L position.
(6) Tighten adjusting trunnion lock bolt.
(7) Lower vehicle.